In this blog we will look into how you can find out what type of soil you have and what pH and nutritional value your garden soil has. We will do this by analysing the soil.
We have already looked into what you need to know about your soil in your vegetable garden to be able to manage your vegetable garden. When you have missed the blog check it out here.
What is in this blog?
First of all we are going to look into the type of soil. For this there is a very simple method. It’s done with a jar and water.
The ‘Type of Soil’ test is based on a very simple principle. You add soil and water to a jar and shake it. Sand particles are course and heavy so they will sink to the bottom of the jar first. Silt particles are less course and heavy, they will sink less fast and settle down on top of the sand. Clay particles are tiny and light, they will float around in the water quite a while. Finally after hours they will settle down on top of the silt.
Depending on the composition of the soil in your garden the separate layers that settle down in your jar will be thicker or thinner. On of the layers can even be absent. You can measure the layers and see what the percentage of the layer is compared to the whole. With the help of a diagram you then will be able to find out what type of soil you have.
You can do this test as a stand alone, but I prefer to do the ‘type of soil’ test and a pH/NPK test at the same time. This way I only need to take the sample from the garden one time. I just make sure you have enough soil for both tests.
For this session you will need 2 jars of more or less 12 cm high and a with diameter of 6 cm. It does not need to be exactly this size. Usually the ordinary jam jar has about this size.
You will also need: a bucket, a garden trowel or small spade, a waterproof garden marker.
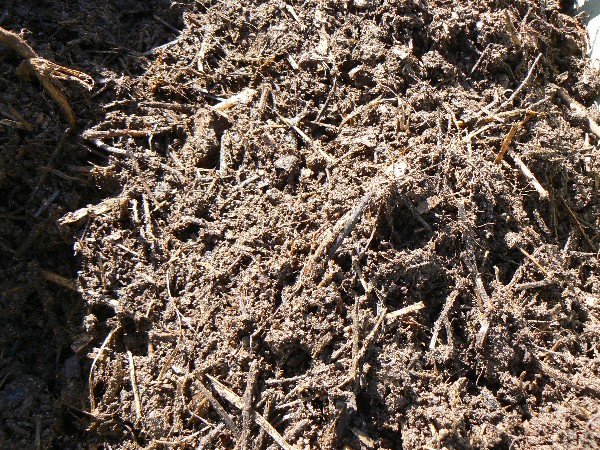
Now take a bucket and go to your plot. Pick a spot, scrape of the first 6-10 cm (2 or 3 inches) organic material. Then with the garden trowel or a small spade, dig some soil and put it in the bucket. Do this at about 6 spots. Mix the soil in your bucket well.
After that take out soil that would be enough to fill about 2 jars. Some of it you will need for the type of soil test and some will be used for the pH and NPK test. Let the soil you have taken out dry.
When the soil is dry take it through a sieve.
Fill one jar for ¾ with the sieved sand. Mark the level of the soil in the jar. Then add some water leaving enough space to shake the soil and water.
Fill another jar with 2 levelled tablespoons for the test and set aside for later when you are doing the pH/NPK test.
Add some clean water into the jar that is filled for ¾, leaving some space at the top to be able to shake the liquid in the jar.
Close the jar well and shake the mixture. When the soil you put in was very dry, it is good to wait 20 or 30 minutes and shake it again. You might have to add a bit more water. Now the whole mixture looks quite messy.
So now, after you have shaken the jar. When there is sand in the soil, the sand will settle down in 5 minutes. Use the marker to mark the top of the sand. The rest will take longer to settle down. You can leave the jar for some hours, up to 24 hours or more. When the next layer has settled down, mark the top of this layer. This second layer will be silt. What settles on top of the silt will be clay. You can either wait for it to settle down or use the drawing to find out. I will explain this a little bit further down.
Measure the height from the bottom of the jar to the top line of the soil that you had made before adding the water. This is your 100%. Now Measure the the thickness of each layer and calculate the percentages.
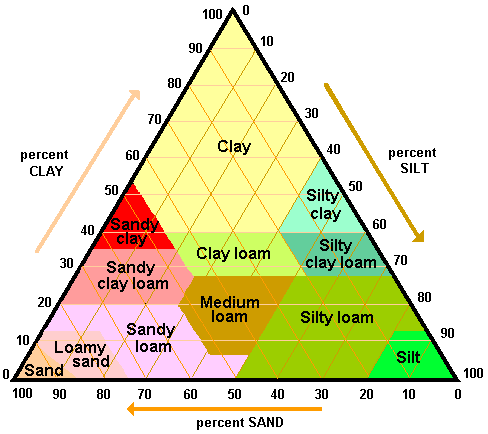
Now we will need the diagram below to find out the type of soil you have. On this triangle you can see that each side represents a scale. You can read out the percentage of sand and silt and see where the lines cross.
Write down your data in your garden book. Or make a file for your garden where you will keep the data from your tests. The type of soil you have will not change, but the nutrition values will. It is practical to have all the data together in a file or a notebook.
You have a soil of 60% sand and 30% Silt. You can then assume that 10% of your soil is clay. When you look into the drawing you follow the 60% line of the sand and look where it crosses the 30% line of the silt. Note that there are two lines starting from each position. One of the two will cross one of the other two.
In this case your soil is a Sandy loam soil.

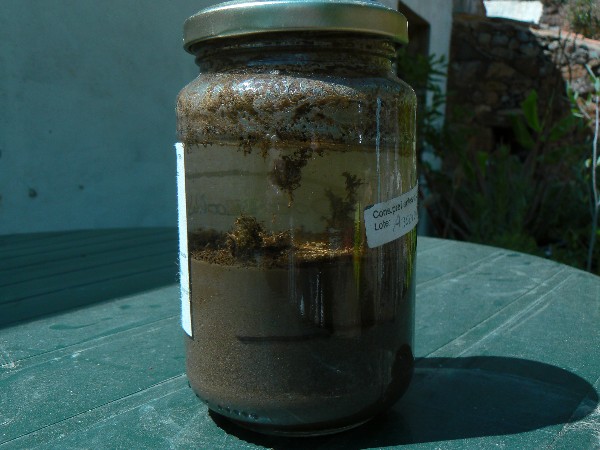
This is what the sample of our vegetable garden look like after everything has settled down.

It has about 55% Sand and 45% silt and if at all very little clay. So our soil is a Sandy loam soil.
The stuff that is floating around is organic material, by the way.
For testing the pH and NPK levels of the soil I use this simple testing kit:
It is not so expensive and it will give you all the information that you will need to get your garden going.
The kit comes with a clear description. It is wise to read this description carefully before you start, so you will not spill any of the tests.
I did the test for our soil. The results were easy to read from the test. The pH of our soil is 6.0. The tels us that a pH of 6.0 is an acid soil. As you can see in the previous blog. It is still very much in the growing range of most plants. The test kit gives you an extended list with the pH preference of a lot of garden plants. This is very practical when you are growing vegetables.
The levels of N and K in our garden where between sufficient and surplus. The level of P was sufficient. That is a happy result for now. I do not need to add anything. At the end of the summer I will test the soil again. So i will know how to organise my winter garden.
You can also send in a soil sample to have it tested. A laboratory will do the test for you.
Apart from NPK the laboratory test also gives you information about the most important, so called micro-nutrients: Calcium; Magnesium; Sulfur and Natrium.
Sending a sample too an official agricultural laboratory can be very expensive. It does come with a more in depth advice though. It will often give you the amount of organic matter that you have in your soil as well. As a starting gardener I would not spend the money. With the information you get from the simple test kit or from the more complicated you will have enough information to get your garden going. Large laboratory test provide a lot of data which are important for a larger scale farmer, but not to us small scale farmers. Too many data can also be confusing…
The next step: how to improve your vegetable garden soil.
You can be lucky and find out that your soil is very good and has all the nutrients that a plant needs to grow. In that case you might not need to add anything right away. You will still need to prepare your garden. If something is lacking you might need to add something. In the next blog we will tell you more about it.