Month: July 2018

  • How to Analysing the soil from your vegetable garden.

    How to Analysing the soil from your vegetable garden.

    In this blog we will look into how you can find out what type of soil you have and what pH and nutritional value your garden soil has. We will do this by analysing the soil.

    We have already looked into what you need to know about your soil in your vegetable garden to be able to manage your vegetable garden. When you have missed the blog check it out here.


    Type of soil test with a jar.

    First of all we are going to look into the type of soil. For this there is a very simple method. It’s done with a jar and water.

    The ‘Type of Soil’ test is based on a very simple principle. You add soil and water to a jar and shake it. Sand particles are course and heavy so they will sink to the bottom of the jar first. Silt particles are less course and heavy, they will sink less fast and settle down on top of the sand. Clay particles are tiny and light, they will float around in the water quite a while. Finally after hours they will settle down on top of the silt.

    Depending on the composition of the soil in your garden the separate layers that settle down in your jar will be thicker or thinner. On of the layers can even be absent. You can measure the layers and see what the percentage of the layer is compared to the whole. With the help of a diagram you then will be able to find out what type of soil you have.

    You can do this test as a stand alone, but I prefer to do the ‘type of soil’ test and a pH/NPK test at the same time. This way I only need to take the sample from the garden one time. I just make sure you have enough soil for both tests.

    A practical session: type of soil and pH/NPK

    For this session you will need 2 jars of more or less 12 cm high and a with diameter of 6 cm. It does not need to be exactly this size. Usually the ordinary jam jar has about this size.

    You will also need: a bucket, a garden trowel or small spade, a waterproof garden marker.

    Now take a bucket and go to your plot. Pick a spot, scrape of the first 6-10 cm (2 or 3 inches) organic material. Then with the garden trowel or a small spade, dig some soil and put it in the bucket. Do this at about 6 spots. Mix the soil in your bucket well.

    After that take out soil that would be enough to fill about 2 jars. Some of it you will need for the type of soil test and some will be used for the pH and NPK test. Let the soil you have taken out dry.

    When the soil is dry take it through a sieve.

    Fill one jar for ¾ with the sieved sand. Mark the level of the soil in the jar. Then add some water leaving enough space to shake the soil and water.

    Fill another jar with 2 levelled tablespoons for the test and set aside for later when you are doing the pH/NPK test.

    Add some clean water into the jar that is filled for ¾, leaving some space at the top to be able to shake the liquid in the jar.

    Close the jar well and shake the mixture. When the soil you put in was very dry, it is good to wait 20 or 30 minutes and shake it again. You might have to add a bit more water. Now the whole mixture looks quite messy.

    So now, after you have shaken the jar. When there is sand in the soil, the sand will settle down in 5 minutes. Use the marker to mark the top of the sand. The rest will take longer to settle down. You can leave the jar for some hours, up to 24 hours or more. When the next layer has settled down, mark the top of this layer. This second layer will be silt. What settles on top of the silt will be clay. You can either wait for it to settle down or use the drawing to find out. I will explain this a little bit further down.

    Type of soil on your plot

    Measure the height from the bottom of the jar to the top line of the soil that you had made before adding the water. This is your 100%. Now Measure the the thickness of each layer and calculate the percentages.

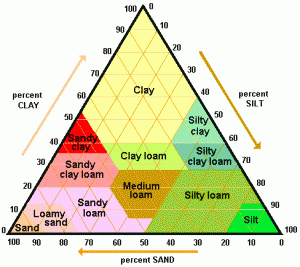
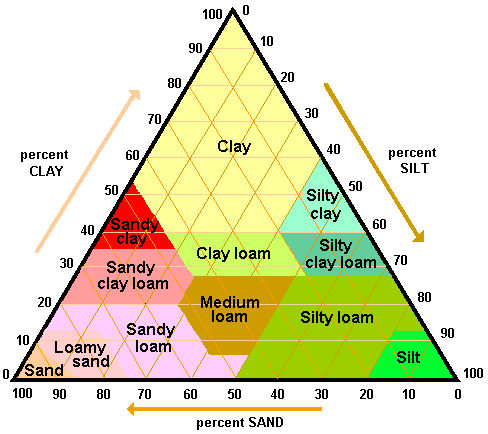
    Now we will need the diagram below to find out the type of soil you have. On this triangle you can see that each side represents a scale. You can read out the percentage of sand and silt and see where the lines cross.

    Write down your data in your garden book. Or make a file for your garden where you will keep the data from your tests. The type of soil you have will not change, but the nutrition values will. It is practical to have all the data together in a file or a notebook.

    This is how you use the diagram below

    You have a soil of 60% sand and 30% Silt. You can then assume that 10% of your soil is clay. When you look into the drawing you follow the 60% line of the sand and look where it crosses the 30% line of the silt. Note that there are two lines starting from each position. One of the two will cross one of the other two.

    In this case your soil is a Sandy loam soil.

    Soil triangle

    Our own soil as an example

    This is what the sample of our vegetable garden look like after everything has settled down.

    soil test with jar

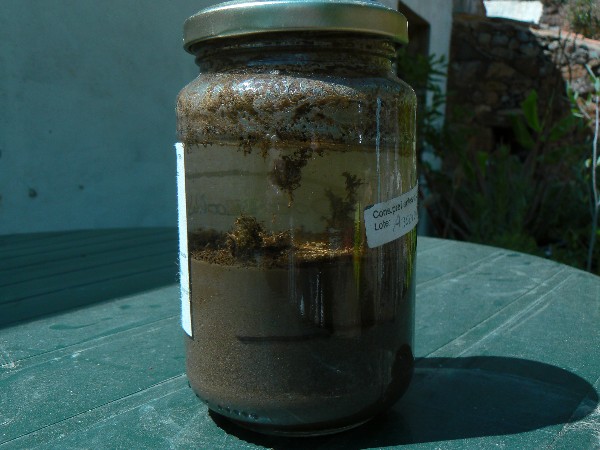
    It has about 55% Sand and 45% silt and if at all very little clay. So our soil is a Sandy loam soil.

    The stuff that is floating around is organic material, by the way.

    Testing the pH and NPK levels.

    For testing the pH and NPK levels of the soil I use this simple testing kit:

    It is not so expensive and it will give you all the information that you will need to get your garden going.

    The kit comes with a clear description. It is wise to read this description carefully before you start, so you will not spill any of the tests.

    I did the test for our soil. The results were easy to read from the test. The pH of our soil is 6.0. The tels us that a pH of 6.0 is an acid soil. As you can see in the previous blog. It is still very much in the growing range of most plants. The test kit gives you an extended list with the pH preference of a lot of garden plants. This is very practical when you are growing vegetables.

    The levels of N and K in our garden where between sufficient and surplus. The level of P was sufficient. That is a happy result for now. I do not need to add anything. At the end of the summer I will test the soil again. So i will know how to organise my winter garden.

    A simple laboratory test.

    You can also send in a soil sample to have it tested. A laboratory will do the test for you.

    Apart from NPK the laboratory test also gives you information about the most important, so called micro-nutrients: Calcium; Magnesium; Sulfur and Natrium.

    An extended laboratory test.

    Sending a sample too an official agricultural laboratory can be very expensive. It does come with a more in depth advice though. It will often give you the amount of organic matter that you have in your soil as well. As a starting gardener I would not spend the money. With the information you get from the simple test kit or from the more complicated you will have enough information to get your garden going. Large laboratory test provide a lot of data which are important for a larger scale farmer, but not to us small scale farmers. Too many data can also be confusing…

    The next step: how to improve your vegetable garden soil.

    You can be lucky and find out that your soil is very good and has all the nutrients that a plant needs to grow. In that case you might not need to add anything right away. You will still need to prepare your garden. If something is lacking you might need to add something. In the next blog we will tell you more about it.


  • Sweet Basil, all you need to know to grow it.

    Sweet Basil, all you need to know to grow it.

    Sweet Basil is an easy, straight forward plant to grow. In this blog you will find all the things you need to know for planning, companion planting, use and storage of Sweet Basil. It also provides you with information about the type of soil it needs and the pH it will grow in. One place to find it all.

    Sweet Basil is just a choice of many types of Basils that are available for growing. I like the Genovese. It has big tender leaves to harvest and I love the taste and structure for making pesto.

    From all the anual Basil I tried to grow, this one came out the best. It grows relatively easy. The other thing is that I think, most smaller leaved anual basil have a hard leave for harvesting. I don’t like hard leaves in salad and for making pesto. For me salad contains tender things. For pesto making the small leave variaties don’t quit make a smooth paste.

    Plant characteristics

    English name: Basil, Great Basil, Saint-Joseph’s-wort

    Latin name: Ocimum basilicum

    Family of: Lamiaceae (mint)

    Maximum size plant: height, 20-60 cm width 15-20 cm

    Root structure and depth: 20-30 cm, round structure

    Spacing (plantafstand): 20-25 cm

    Companions: tomatoes, apricot, asparagus, cucumber, fennel, zucchini, stinging nettle. Sweet Basil needs sunlight to grow. When growing them next to high plants like tomatoes and asparagus, make sure they are on the sunny side of the high plants.

    Not companion with: Rue Herb, Chard/Silverbeet, Wormwood

    Remedies for: Aphids, Fruit Fly

    Water needs: medium in loamy soils. In sandy soils water properly otherwise they will go into flowering very quick.

    Food needs: no fresh manure, compost, tolerates fresh compost.

    Light: lots of sun

    What type of soil: Sandy soils of any kind, loam/clay soils when they are rich in organic matter. Loves it fluffy. For more information about soil types click here. For finding out more about analysing your vegetable garden soil click here.

    pH: 5.1-8.5

    Weed tolerance: does tolerate some weeds as long as it is bigger than the weeds.

    This is how it looks:
    Basil Genovese
    Picture 1: Full grown Sweet Basil, time to harvest.
    Young Sweet Basil plants
    Picture 2: Young Sweet Basil plants. The first two leaflets are still visible.
    Flowering sweet basil
    Picture 3: Flowering Basil. Leaves will be less tender. When you take the flowers out it will continue growing. You can use the flowers as well.

    How to seed

    Pre seeding: When the season, where you are, is short you can pre seed in pots.

    Make sure you buy the right soil. Soil for growing pot plants is to rich for seedlings. The special soil for seeding is the one that works.

    Handy and time saving is to seed them in trays. Peet seeding trays can be used integral. You do not need to take the plants out but plant the plant together with the pot. This way you do not disturb the roots, which gives the plant a growth advantage. This might be handy if you only have a short growing season.

    You can also use the cheaper reusable seeding trays, when your season is longer. I would put some flat trays under the seeding trays to catch the surplus water when watering the trays. Here you find some affiliate options. When you use these links you will support our farm. Please feel free to click on the picture.

    Seeding directly: In long season areas you can seed directly. I usually seed a small row next to where I want to grow them so I can easily plant them out. To recognise the small seedlings: make sure the seedbed is well weeded and raked.

    Seed distance: 5 cm

    Depth of seeding: 0,3 cm

    Tip for saving time:  buy a pot with basil in the supermarket and plant them in your garden. The growers usually squeeze a lot of plants in the pots. Turm the pot you bought up side down and carefully take the earth and plants out. After that carefully separata the plants. Now you have lots of plants to plant out. They will still grow a fair amount.

    This can be done until later in the season. When you just want to grow a few plants this might be a good option.

    Growth

    Germination temperature: 21-29°C. This is essential for growing Sweet Basil. It will not germinate when the temperature is not high enough. Best is when the soil has warmed up till 21°C. Give the soil a week or so to warm up a bit. Note: in clay soils the temperature of the soil stays cool longer, this might stop your Basil from germinating.

    Germination time 5-10 days

    Duration from seed to Harvest: 60 days max

    Seedlings: Seedlings start to grow with two heart shaped leaflets. In picture two these small leaflets are still visible.

    Harvest

    Harvest when full grown and leaves are lush (see: picture 1). You can stil harvest when it is flowering, leaves will not be as tender. The flowers (picture 3) have a strong taste and are good to harvest too.


    How many plants will you need?

    It depends on what you want to make from it. With the two of us we, ideally, grow between 30 and 50 plants. We grow them only once a year. We make a lot of pesto for the rest of the year. When we have no time to cook a big meal we use the pesto with some pasta and dried tomatoes. Easy and quick. So a lot of basil fits in our household.

    When you just like it every now and then in the salad you might be all right with just 10-12 plants. When you have a long growing season you can plant a few plants early and some later in the season.

    Storage

    When you dry Sweet Basil it will lose most of it’s charming taste. So, I think that is not really an option. I think eating it fresh or making it into pesto are the best two option for Sweet Basil.

    To preserve I freeze the pesto (see: recipe). You can also use jars to keep the pesto, but do not add the cheese. I do not know why it works with the jars of pesto that you buy in the supermarket. It always goes of when I add the cheese, no matter what I do.

    When you preserve pesto in jars be aware that there is, however small a change of getting botulism into your jar. For this add some lemon juice to the mixture. It will keep the color nice and prevent the bacteria that cause botulism to produce the poisonous botox by lowering the pH.

    Recipes

    Pesto

    Fill up an blender jar for 2/3 with Sweet basil leaves. Add three or four hand full of nuts. Just any nuts will do.

    The official recipe is with pine nuts, but these are very expensive where I live. Almonds and wall nuts are much cheaper here so I use those.

    Add the juice of halve a lemon and two or three cloves of garlic.

    Blender it & freeze it in portions. It is not easy to cut it when frozen, so it is better to freeze it in desired portions.

    Add some grind cheese when used.

    Tomatoes, Basil and Mozzarella

    This is so easy to make and it is delicious.

    Slice some tomatoes in 1-2 cm thick slices.

    Lay them on a large plate.

    Slice the mozzarella in 1-2 thick slices.

    Put the slices on top of the tomatoes.

    Sprancle on a fair amount of Balsamico.

    Cover the whole with Basil leaves (one leave per tomato slice).


  • About the soil in your vegetable garden, what you need to find out.

    About the soil in your vegetable garden, what you need to find out.

    Let’s go deeper into the soil matter. In this next chapter you will see what you need to find out about the soil in your vegetable garden.

    lettuce

    Soil… What is soil anyway?

    Soil that is good for agriculture consists of more or less: 48% minerals, 25% water; 25% air and 2% organic material. These 2% organic material seem to be very little, but it is of the greatest importance. From this 2% just 5% is alive. The living soil is small in volume but incredibly large in numbers of microorganisms.

    What organic material does.

    A lot of creatures are living in the soil of our garden. Moles, mice, worms, insects. These once you can see, but there is also live in the soil that you can not see. Microorganisms they are called. And they are large in numbers.

    These invisible creatures munch the bigger organic matter in the soil into smaller parts. And then in even smaller parts until what is left is a chemical part that can be ‘eaten’ by the plants. Some of it is eaten by the plants and some stays in the organic matter as a buffer for later. Like a pantry.

    Besides the food for the plants that is produced by the microorganisms in the organic matter, the organic matter contributes to a good soil structure. The soil will be able to contain air and water in a good balance as well.

    Learning more about the soil in your garden

    What type of soil you have in your garden will determine what you will be able to grow well. By knowing what kind of soil you have, you will also know how you can improve your soil so you can grow as many different vegetable as possible. Learning about your garden soil is the basis of good gardening. It is very important as you will see as we go along.

    There are three main thing you need to know as a starting vegetable gardener:

    What acidity your soil has; what type of soil the garden plot has and the amount of nutrition that is available for the plants in the soil.

    Acidity

    Some plants like potatoes like it more acid, some like peas and bell peppers, like it a bit less acid. Where potatoes can still grow, bell peppers might not. The acidity of the soil influences the amount of nutritions that the plants can take out of the soil. Bell peppers might not be able to get as many nutritions as they need out of the soil when it gets too acidic for them, while at the same acidity potatoes would still do fine.

    Knowing what acidity the soil in your garden has, means to know what grows well. It is also possible to influence the acidity of the soil by adding something alkaline, like lime. But you need to be very careful with adding lime, because once added too much you can not reverse to getting it more acidic. A lot of plants can not grow on a soil that is too alkaline.

    So be aware that you can create an irreversible problem by adding too much lime. There might be other reasons why your plant does not want to grow. Check these first before applying lime. How to check your soil will be discussed in the next blog.

    Acidity is scientifically expressed in pH. The pH scale goes from 0 to 14. A value of 7 is called neutral. That means it is not acid nor alkaline. Values under 7 are called acidic and values over 7 are called alkaline.

    Pure water has an acidity of 7. Lemon juice, vinegar and rain water are on the acidic side of the scale. Egg white, solved chalk and soap are on the alkaline side.

    If you want a more scientific explanation of pH click here. This link also tells you something about the history of the term pH. Ever thought about it why it is called pH?

    pH tolerance of vegetables

    To give an idea of what grows in which range here are some examples:

    Potatoes: 4.2-5.3
    Onions, leek, lettuce, spinach:  5.4-6.4
    Cucumbers, tomatoes: 5.7-6.4
    Bell peppers, beans: 6.0-6.5

    You can find a longer list of pH tolerance of plants when you click here (scroll down the page).

    Why are the potatoes in the link growing at an acidity of 4.8-6.5 and in this blog from 4.2-5.3 ? It might be that the potatoes are from a different variety. Or the soil that functions as a standard is different. The 4.2-5.3 counts for a sandy soil. The 4.8-6.5 might counts for a loamy soil. This is quite a technical story so I will not go there. But be aware that these indications are an indication and not an absolute figure. And that there is always a correction depending on the soil you have. The correction for the sandy soils more to the acidic side and the correction for the clay soils is more on the alkaline side.

    The type of soil

    Roughly soil types are divided amongst clay, sand and silt soils. The clay soils have a very fine structure, the particles are very small. Clay is sticky and greasy when wet. The sand has a more coarse particle then clay, the particles are loose, even when wet. Silt soil is somewhere in between the two.

    There are three main reasons why you want to know what type of soil you have.

    1. The ideal pH for your garden depends on the type of soil. In the description below I will point out the ideal pH per type of soil.
    2. The different type of soils can contain more or less air and/or water.
    3. Specific plants can have preferences for a certain type of soil.

    Here is a quick overview which soil does what:

    clay

    Clay

    Clay contains tiny particles that are hard and which compact easily. It is a heavy difficult soil to plant and shovel in. In Holland heavy clay soils are ploughed before the frost, leaving big wet lumps of clay on the fields. The water in the lumps freezes in winter. And because water expands when frozen it breaks the clay. This way the clay becomes workable for agriculture in spring. Potatoes, cabbages and onions are grown on these soils.

    These soils are not 100% clay, if so they would be you could not work them. Pure clay is the soil that you make pottery from. Clay hold water when soaked. But because the structure is so dense the water will run of very easy when the clay is dry. Clay that dries can crack and it will not hold a lot of air.

    Clay soils when wet feels a bit greasy and it is sticky. When rolled between the hands the clay forms a role that will not break.

    Clay is slightly alkaline. The ideal pH to grow vegetables in clay soils is 7.2-7.7 .

    Sand

    Sand

    Sand particles are relatively course. You can see them with the bare eye. There is a lot of air between the particles and it does not compact. It drains the water too well so the water does not stay around the roots of the plants. It does not hold nutrition for the plants. Sand soils need a lot of compost or manure every year because the compost and the manure get washed through the sand with the rain. Roots however can easily find their way in the sand. Carrots, radishes and asparagus grow well in sandy soils.

    Sand is gritty to the tough. When squeezed it does not stick together at all.

    Sandy soils are usually slight acidic. The ideal pH to grow vegetables in sand is 5.2-6.5 .

    silt

    Silt

    The size of particles of silt are between those of clay and sand. It holds the moisture better than sand. Nutritions are better kept around the plants as well, so it is often fertile. It can still compact easily and is prone to erosion when not well maintained.

    The ideal pH to grow plants in in silt is 6.7-7.3 .

    loam

    Loam

    Loam is a mixture of Clay, Sand and Silt. It is easy to work with, holds the moisture and nutritions. This is the best garden soil, I think. It also contains enough air.

    There are all sorts of mixtures between Sand, Silt and Clay. In this drawing you will find them:

    Soil triangle

    Nutrition value

    Another thing that is important to know is: how fertile is your soil? How much nutritions does it have?

    The main food that plants need are Nitrogen (N); Phosphorus (P) and Potassium (K). Apart from that there are some important spore elements like Magnesium.

    The plants need Nitrogen for growth, color and density. Phosphorus supports the growth of new roots and shoots. Potassium supports the plants health in general. It also supports stress, disease and cold resistance in plants. All three elements are vital for plant growth.

    Back to your vegetable plot & the next blog

    So now that you know all this, how are you going to find out what the soil is like in your vegetable plot? What pH will it have? What type of soil? And will it have enough NPK?

    For this you need to analyse the soil. You can find out how to do this in our blog: How to Analyse the Soil from Your Vegetable Garden.